SEO Membership Login

Archive | WordPress

RSS feed for this section

Fathers, don’t let your daughters grow up to be like WordPress.

27 May

Wow! WordPress is 10 years old today! Although I can’t say much for it being much of a role model…
If I ever have a daughter that grew up to be like WordPress, she’d…

  1. Be popular enough to get used by 60% of all the boys (and girls) at school…
  2. Be a world traveler, being logged into in over 120 different countries.
  3. Be accessible to multiple users.
  4. Be open enough to take all kinds of plugins in the backend.
  5. Be willing to change into different sexy wares to mix it up from time to time.
  6. Be totally dynamic, unlike those other static websites that just lie there.
  7. Be willing to get a facelift when it’s apparent she’s looking a little old and used up.
  8. Have weekend workshops around the world devoted to learning how to manipulate her better.
  9. Give her goodies away for free, but know to charge for something when people really want it.
  10. And…. Be a little susceptible to the occasional virus, but nothing a little Sucuri-cillin won’t clean up.

Fathers, don’t let your daughters to be like WordPress.

HAPPY BIRTHDAY WORDPRESS!!!

Edit: Here’s a post by Matt waxing poetic about his lovely creation.

WordPress 3.5 Drops… ProPhoto Users Wait

06 December

Photo Credit Lucas Cobb

Dec 6th – 2:30am PST

I’m about to call it a night. But I just saw a couple tweets between Lead WordPress Developers Mark Jaquith and Andrew Nacin that they just made there December 5th deadline for the much awaited WordPress 3.5. That was Hawaii time apparently 🙂

The new version hasn’t been pushed out yet. I guess there’s a whole behind the scenes thing that I don’t know about (maybe I’ll learn that process some day). I expect all of our Admin areas to have a bright blue Update button when we all wake up in the morning.

I know, I know, I’m a total dork. I’m sure it sounds like I’m reporting the preparation for the first Apollo mission back in the 60’s. But this release does have me feeling a bit like I’m 8 years old on Christmas Eve. And tomorrow when I wake up, I get to download, er I mean unwrap a present that I’ve been waiting months to get.

Sadly… There are some less fortunate little boys and girls that don’t get to experience this Christmas joy for quite some time. Those little boys and girls are the professional photographers that use the ProPhoto theme. On a statement on their blog NetRivets indicated that they would not be making their theme compatible with WordPress 3.5’s radical new media uploader. You will be able to upgrade, but they will prevent the new Media Uploader from working, leaving you with the old one and those itty bitty thumbnails.

Yes… it’s true (not really). ProPhoto killed Santa. (Pure speculation – I have no proof).

Why Lord? Why is ProPhoto killing Santa?!?!?!

Oh… I know. I’m being a wee bit dramatic.

But here’s the thing. ProPhoto does quite a bit to lock down key functionalities of WordPress in order to control things their own way. It’s supposed to be a theme that you place on top of WordPress, but it’s not a theme, it’s a framework with it’s own agenda. You know when Loki turns Hawkeye into a bad guy in The Avengers? Yeah… It’s kinda like that. It won’t let you create Custom Page templates, you can’t use WordPress’s beautiful menu system, and now worst of all, for many photographers that would LOVE to use the new system, they won’t release the strangle hold they have on WordPress.

They’re even bold enough to say that they are “the most well-respected photo blogging tool in the industry.”

No You’re Not. WordPress is!

At this point, I’d drop the mic and walk off stage, but there’s a dilemma for those that use ProPhoto and have that Siren sweetly singing to them to press Update to 3.5 in the Admin area of their WordPress sites. Do you upgrade?

Aside from the Media Uploader tool, a lot of what was worked on were enhancements to the behind the scenes stuff. If you have a Retina MacBook, the Admin area is designed to look good (I haven’t seen this in use), and if you use Multisite it’s easier to use subdomains (although I highly doubt many ProPhoto users use multisite).

The backend enhancements were things like upgrading jQuery, and other external scripting libraries, which could have a significant impact on ProPhoto. With all these changes taking place, I would be willing to put some money down on ProPhoto having to scramble to release a fix for people that want to use 3.5 in the next couple weeks. This happened when 3.1 (or 3.2) came out, and I expect it to happen again this time around.

So… My dear unfortunate ProPhoto users,

My verdict… Don’t Upgrade Yet.

Wait a few weeks… Keep an ear out for what other early adopters are saying. Then when ProPhoto releases their patches, go for it. It’s always important to stay up to date with WordPress. But when you use a third party solution like ProPhoto, it’s even more important that they work together.


Update Dec 6 – 2:00pm

Just a heads up for those looking in their Admin area. It looks like there were a few bugs left to squash. I’m keeping up with the updates from the Development Team as they come through on Twitter, and will post again when 3.5 goes live.

Those Pesky 404’s and What To Do With Them

02 December

Have you ever been on someone’s site or blog, and clicked on a link only to find a page that says “Page Not Found – 404 Error”? They’re quite annoying when you bump into them aren’t they? Well, what if I told you that you more than likely have them on your site too? Yep, that’s right, the odds are not in your favor when it comes to 404 errors.

The problem with 404 errors is that it reduces the quality of your site. This is an issue for both:

  • The people that visit your site (your potential customers leave when your site when they can’t find what they want)
  • and Google (Google rewards sites that are well maintained, if you don’t maintain your sites, your sites will suffer)

Would you like to know how to find and eliminate them? I thought so…

Finding 404 – Page Not Found Errors

In order to find your 404 – Page Not Found errors you’ll want to log in to your Google Webmaster Tools (GWMT for short). If you don’t have GWMT set up, you should (sign up here with your Gmail or Google Apps account. You can read a little bit more about GWMT in our free ebook Photographers Web Marketing E-Book.

Once you’re in GWMT look at the left side and click Health, then Crawl Errors. You’ll see the trend of errors over a few months. It could be growing or shrinking, the goal of course is to shrink them. Here’s a view:

As you can see you can see the current number of Errors, and down below you can see the actual addresses that have the errors so you can find out which ones are the problem. Once you fix them (keep your britches on, we’re getting there in the next session), you can check each one, and click the red “Mark As Fixed” button, and Google will confirm you fixed it, and remove the error.

I would check this every few months to ensure that your website quality is always maintained. You can easily schedule this as a recurring calendar item in Outlook or G-Calendar.

How to Wipe Those Pesky Buggers Out

Now that you’ve got a list of your 404 errors, it’s time to fix them. There are a few reasons why a page might be missing:

  • You may have changed the url of a page
  • You may have deleted a page that you didn’t need anymore
  • You may have deleted a page by accident
  • Misspellings (either from you or other people).
  • You forgot the “http://” portion of a URL.

Determining what the error is takes a little detective work. But it should be pretty easy to figure out if you know your content.

The Easy Fixes

Easy fixes will be the ones that you obviously misspelled or forgot to put the “http://” in the original linking Page or Post. All you have to do is go into the place that you referenced and fix the URL.

The Not So Easy Fixes

Not so easy fixes are the ones that other people misspelled their links, or you removed content, moved content, etc. Or things that you just can’t figure out why you got a 404 in the first place. What I like to do is use a WordPress plugin called Redirection. Redirection is a great tool that will actually help you when you move content, change addresses of Pages and Posts, or even change your Permalink Structure.

In this case we’re going to manually insert the error URLs and provide new URLs to take the place of the old ones. This creates a 301 redirect which is a server code that tells Google and other computers and servers that the page you are trying to view permanently moved to a new location, and redirects the viewer automatically (all behind the scenes).

When you have Redirection installed, go to the menu on the left side of your WordPress Admin area, and go to Tools, Redirection is under Tools. Click on that, and you’ll see this:

If you’ve figured out WordPress, using Redirection should be pretty easy to use. 🙂 Just enter your problem URLs, and your new URLs, and you’re good to go.

Here are a few tips on selecting the right URLs to send to:

  • If you moved the Page somewhere, try to find that URL
  • If you deleted a Page, try to find something similar to the Page you deleted (example: If the problem URL pointed to a Wedding Photography Promotion you deleted, you can have it point to your Wedding Photography Pricing page)
  • If you don’t have something similar, you can redirect it to your home page (do this sparingly)


Bringing it Full Circle

Once you’ve gone through and fixed your problem URLs (whether it was an easy fix to a typo, or having to redirect an old URL to a new one), you’ll want to go back into GWMTs and check off each URL that you fixed, and hit that red button. That will get Google to re-crawl those links and check your work. If your URLs had great information on those pages, you’ll be rewarded with having those pages indexed again and generating traffic yet again.

Who knows you may have a huge bump in traffic and potential new customers that were trying to get your content for some time.

OK… Go forth and fix your websites! And as always, if you need help, we’re here for you as well.

Why Insert All – Use Gallery Shortcode

30 November

One of the Holy Grails for photographers using WordPress is inserting all the photos from a particular photo session or wedding. There have been a few plugins that have tried to fit the bill for what our picky tribe have wanted.

But much like the Secret Menu at In & Out Burger, WordPress has a little Secret Menu itself that takes care of this problem. It lets you insert all your uploaded photos, and lets you re-order them if you ever need to very easily. It’s calle the Gallery Shortcode, and is very easy to use, let me walk you through it.

Step 0

Before we get started, you’ll want to set your Large photo to at least the same width of your blog (Twice that if you want to be ready for Retina displays). So if your blog displays 800 pixel wide photos, you’ll want to go into your Media Settings and change the Large photo to 800 pixel wide.

  Step 1

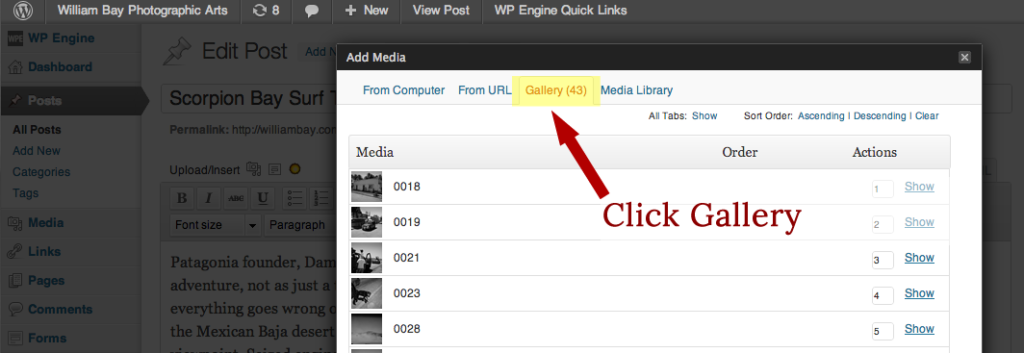
Start a new blog post and write the content that you want, then click on the Media Uploader to upload your images. After they’ve uploaded, click “Save All Changes” at the bottom of the upload screen. When you do that, you’ll see a new menu item pop up in the top called Gallery with the number of photos you just uploaded.

Step 2

You can change the order of these photos by selecting them and dragging up or down. When everything is set right for you, you can scroll to the bottom, select 1 Column, and then click Insert Gallery.

Step 3

In the Visual Editor, you’ll now see a blue rectangle that represents the Gallery that you just inserted. Since the Gallery defaults to Thumbnail size, if you were to preview your blog post now, you would see 1 column of small photos. What we want to do in the next step is change those to Large.

Step 4

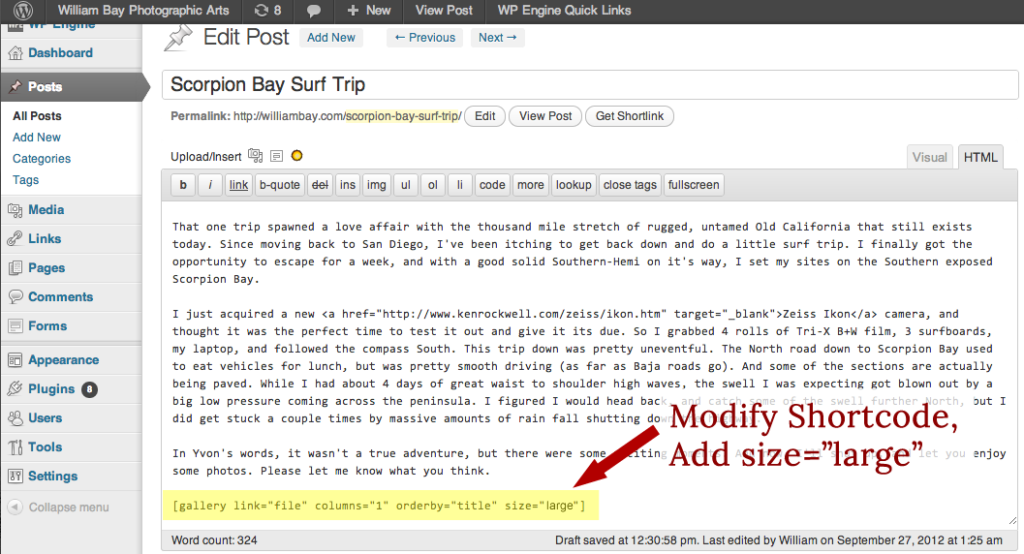
To change the photos to Large, you’ll have to switch into the HTML editor, and find the Gallery Shortcode. The Shortcode will be within [] brackets and will look something like

You’ll want to add – size="large" to the code so it looks like

And you’re done!

Step 5

Publish and rejoice! You can see this particular post here.

Conclusion

The great thing about using the Gallery Shortcode is that you can go back into the post and reorder the images if you ever need to, by just going back into the Gallery menu item at the top, updating the order, then updating the post.

If you use the Gallery Shortcode, the style may be a little different than just inserting the images directly, depending on your theme. If you want to adjust the spacing between photos, or remove any borders that show up, you’ll have to go into the CSS and make the changes there. If you’re not comfortable, give us a ring, we can help you out.

If you use this technique, let us know. We love hearing it when our followers get some use from our tips.

Update

@jonyoder from Jon Yoder a wedding photographer from Little Rock pointed out that when using the Gallery Shortcode method you can’t insert text in between images. This is true, but you can use Captions for each photo. These will display differently based on which theme you’re using. But this is an effective way to describe your photos or talk about what was happening. Thanks for pointing that out Jon!

Awesome Changes in WordPress 3.5, Photographers Will Want To Know About

19 November

WordPress 3.5 is just around the corner, and there are some hot new changes that will be beneficial for photographers. They’ve talked about a new Media Uploader as one of the new features, so I’ve been stalking the Betas as they’ve been released to see what improvements they’ve been making. Last week the third Beta came out I thought I’d give a sneak preview of my findings and thoughts on the new direction they’ve taken.

Current Problems

Currently WordPress isn’t designed to handle lots of images. Your typical blogger uses 3-5 images in a blog post at most for a 400-800 word blog post. Professional Photographers on the other hand often use 20 or more; I know some crazy photographers that have put 100 or more photos in a blog post even! Inserting all those photos is a P.I.A. using the current uploader. Sure there are tricks like using the Gallery Shortcode, but using the Shortcode is like ordering off the Secret Menu at In & Out Burger; there’s some great stuff on it (can you say Double Double Animal Style?), but maybe 20% of the people know about it. And in the case of the Gallery Shortcode options, maybe even less.

I think the guys at WordPress finally figured that they needed to beef up the ability to handle more images than they were used to. It really shows in this latest Beta. Let’s take a look…

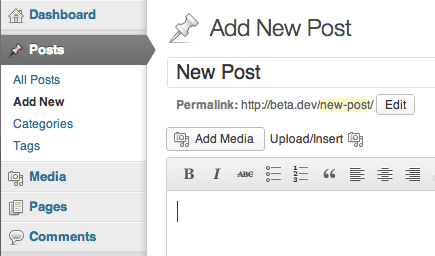
In the Beta they have both the new way and the old way to insert Photos and other Media. By selecting the Add Media button, you get the new version.

I’m not sure what the plans are for the final release, but I would imagine that they would eliminate the old uploader. There will undoubtedly be upset people at first, but as they get used to the new system, I’m sure they will come to enjoy using it.

The New Dialog Box

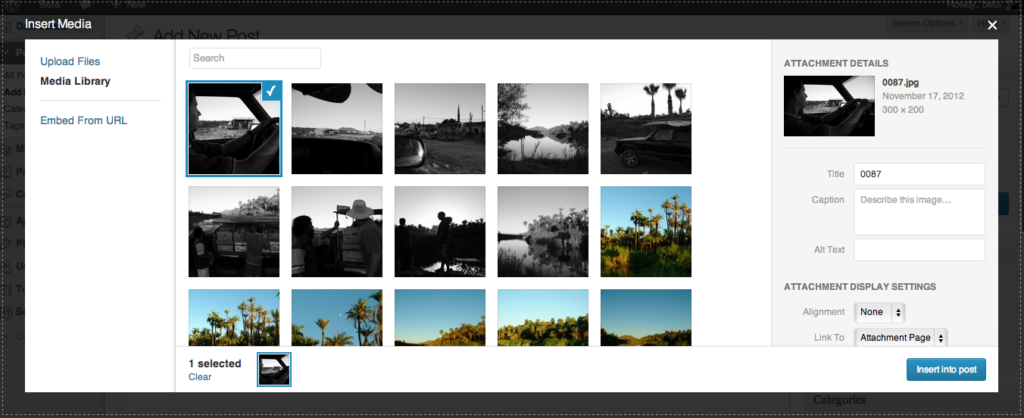
As you can see, the new Insert Media is redesigned quite a bit. They’ve moved the “Upload Files,” Media Library,” and “Embed From URL” options to a new left column, and increased the size of the dialog box to be full screen. This helps display more thumbnails, larger when adding photos or looking through the Media Library.

The Media Library Option

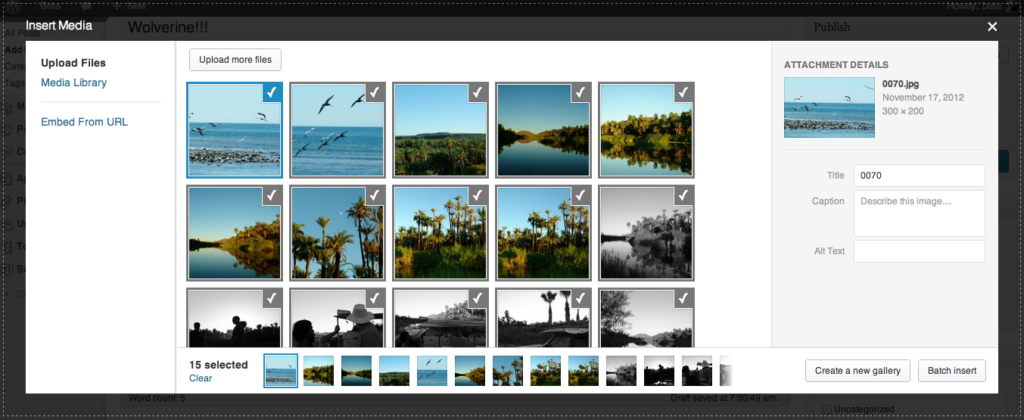
Selecting photos from the Media Library is much easier than before. Before the thumbnails were small, you couldn’t see the meta information without clicking the image and waiting for its properties to drop down, and you only had the ability to see 10 photos at a time.

In the new system the thumbnails are much larger, and… they’ve added INFINITE SCROLL!!! WooHoo!
The column on the right gives you a preview of the photo selected, and the meta is displayed right there, making it easier to add or change Titles, Captions and Alt Text as well as a few other things.

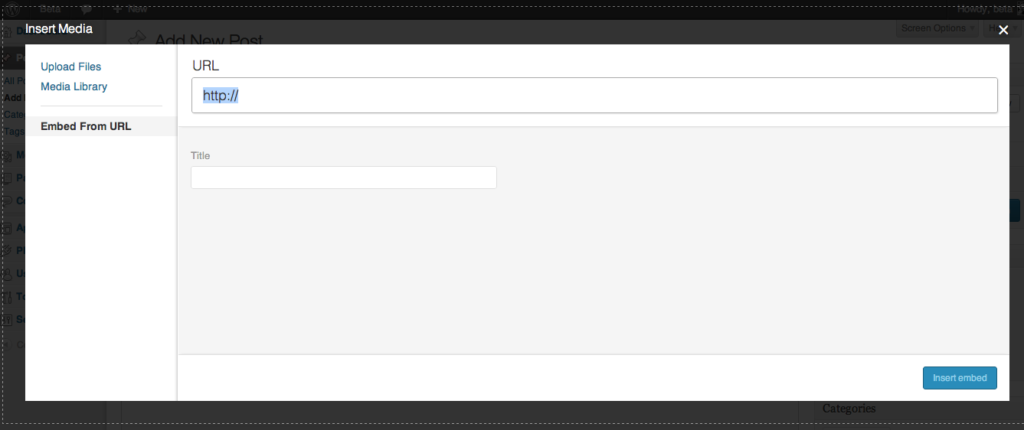
Embed From URL

While they’ve made many improvements to the Media Library, the Embed From URL option seems like it was just an after thought. It may not be a very frequently used option these days, but it still seems like they didn’t spend much time on it. It pretty much floats in a huge dialog box. They could’ve made the dialog box shrink to an appropriate size when selected to give a bit more polish and thought.

Inserting Photos

The process of inserting photos is much easier now. The dialog is very similar to the Media Library with its larger thumbnails and ability to scroll through all the photos you uploaded. Your information is displayed in the column on the right, and you now have the ability to Insert All Photos. This is a feature that’s been long overdue and has been tried by plugins (even we had a solution for awhile that did this). You can also create Galleries (if you’re not familiar with them check out how WordPress Galleries work).

Although WordPress has stated that it’s complete, there are a couple points that I think need to be modified before the public version:

  • There is no Select All button. You can Clear All selections, but you can’t Select All yet. So if you insert 40 images and wanted to use them in a Gallery, and you accidentally Clear All, you have to select all 40 images one by one again.
  • The smaller thumbnails below the thumbnail window is a bit redundant. It shows 12 images, whereas if it were eliminated, you’d have full view of 15 larger thumbnails.
  • The left column with the Upload Files, Media Library and Embed From URL is pretty much wasted space at this point. It may be better to stick them across the top like before to pick up a little more real estate for the thumbnails.

Final Thoughts:

While this isn’t a professional solution (don’t worry, Flaunt Your Site is working on that), the changes that WordPress has made will be highly welcomed by the photographers that deal with high quantities of photos on a daily basis. While it still has some items that need to be addressed, I think that the new WordPress Media Uploader is a decent first attempt at a new method of getting your photos in your posts and pages.

OK, so when do we get it?

WordPress has the release scheduled for December 5th. So we’re just a couple short weeks away from being able to use it! Keep an eye out for that Update WordPress button, and happy photo uploading.