SEO Membership Login

Blog

Keep an eye out for our blog posts! We love to bring you all the good SEO & WordPress tidbits.

Should I Put My Blog On The Front Page of My Site?

09 December

There’s a misconception that gets around quite a bit in the photographic industry. And that’s that having your blog posts display on the front page of your website is better than having a static page. And I’d like to de-bunk that myth for you today.

Why is it a popular idea?

The whole idea about putting your blog on the front page of your site came about from three pieces of information:

  1. Blogs naturally attracted lots of search traffic do to it being based in actual text for content.
  2. Most photographers were using a Flash based solution for their main website.
  3. Google loves sites with fresh content. (Another myth, actually).

Based on this information, I could see why people would be flocking to move their blog to the front page. And your blog outperforming your Flash website would be cause for celebration. But, hey I could get an 6th grader to create a website that will outrank a Flash site.

So what’s the problem?

The problem is that when you have your blog on your main page, it becomes more challenging to rank for one specific keyword. As I mentioned in an earlier post, you want to limit the keywords your targeting to one or two per page. This makes it easier to optimize that particular page.

But when you keep your blog posts on the main page, you get a mish-mosh of keywords coming through. One week it could be about weddings, the next about a high school senior you photographed.

With the blog on the front page, the content becomes volatile and you have no way to optimize it. You know the “O” in “SEO.”

Also from a site design/user experience, your users become lost all of a sudden. Your main page should help them find what it is they want to find, and a long stream of photos don’t do that.

And… I bet you have a solution, Mister Smarty Pants?

As a matter of fact… Yes!

Make your main page, a page that really helps your clients find out what they need, or what you would like them to do. Keep it simple and the hub for everything they can get from your business. Remember, for most, it will be their first impression of you and your business, so how would you like that experience to go?

Remember to think of your client first. SEO second.

That said, your front page will always rank better for the keywords you want to rank for because of the consistency. If your keywords never change or fall of the page, you will firmly establish that page as the page that Google wants to serve up to people looking for that term.


Myth…. Busted!

Call To Actions That Really Call Action

07 December

In a very special Friday edition of the Flaunt Your Site Blog, we’re going to do some video! We wanted to talk about Call To Actions for your photography blogs and what are good call to actions and what aren’t.

So we’ve enlisted some very brave participants to share their sites and take part in the critique.

We have
Tom Koeting from TomK Photo from Ft Collins, Colorado.
Kacy Jahanbini from Princeton, New Jersey
And Amber Wilkie from the Virginia/DC area.

So without further ado.

Tips to remember when crafting your Call To Actions:

  • Have strong call to actions. “Look at my Portfolio” is not a strong call to action. After an emotional blog post, you want to leverage that and have them contact you to book a wedding or portrait session.
  • Keep your call to actions uncluttered. Don’t distract people with other things on your site. Make every inch of your website earn it’s keep.
  • Remove barriers. Make it easy for people to contact you.
  • Use a contact form on a separate page. Don’t use Ajax dropdown contact forms, they can’t easily be tracked in Analytics.
  • Test how well they work and modify if needed. Have a separate Book Me page, and see how many views it gets over 6 months to see if you’re call to action is working.

I hope that this was helpful for everyone. Please let us know in the comments below.

WordPress 3.5 Drops… ProPhoto Users Wait

06 December

Photo Credit Lucas Cobb

Dec 6th – 2:30am PST

I’m about to call it a night. But I just saw a couple tweets between Lead WordPress Developers Mark Jaquith and Andrew Nacin that they just made there December 5th deadline for the much awaited WordPress 3.5. That was Hawaii time apparently 🙂

The new version hasn’t been pushed out yet. I guess there’s a whole behind the scenes thing that I don’t know about (maybe I’ll learn that process some day). I expect all of our Admin areas to have a bright blue Update button when we all wake up in the morning.

I know, I know, I’m a total dork. I’m sure it sounds like I’m reporting the preparation for the first Apollo mission back in the 60’s. But this release does have me feeling a bit like I’m 8 years old on Christmas Eve. And tomorrow when I wake up, I get to download, er I mean unwrap a present that I’ve been waiting months to get.

Sadly… There are some less fortunate little boys and girls that don’t get to experience this Christmas joy for quite some time. Those little boys and girls are the professional photographers that use the ProPhoto theme. On a statement on their blog NetRivets indicated that they would not be making their theme compatible with WordPress 3.5’s radical new media uploader. You will be able to upgrade, but they will prevent the new Media Uploader from working, leaving you with the old one and those itty bitty thumbnails.

Yes… it’s true (not really). ProPhoto killed Santa. (Pure speculation – I have no proof).

Why Lord? Why is ProPhoto killing Santa?!?!?!

Oh… I know. I’m being a wee bit dramatic.

But here’s the thing. ProPhoto does quite a bit to lock down key functionalities of WordPress in order to control things their own way. It’s supposed to be a theme that you place on top of WordPress, but it’s not a theme, it’s a framework with it’s own agenda. You know when Loki turns Hawkeye into a bad guy in The Avengers? Yeah… It’s kinda like that. It won’t let you create Custom Page templates, you can’t use WordPress’s beautiful menu system, and now worst of all, for many photographers that would LOVE to use the new system, they won’t release the strangle hold they have on WordPress.

They’re even bold enough to say that they are “the most well-respected photo blogging tool in the industry.”

No You’re Not. WordPress is!

At this point, I’d drop the mic and walk off stage, but there’s a dilemma for those that use ProPhoto and have that Siren sweetly singing to them to press Update to 3.5 in the Admin area of their WordPress sites. Do you upgrade?

Aside from the Media Uploader tool, a lot of what was worked on were enhancements to the behind the scenes stuff. If you have a Retina MacBook, the Admin area is designed to look good (I haven’t seen this in use), and if you use Multisite it’s easier to use subdomains (although I highly doubt many ProPhoto users use multisite).

The backend enhancements were things like upgrading jQuery, and other external scripting libraries, which could have a significant impact on ProPhoto. With all these changes taking place, I would be willing to put some money down on ProPhoto having to scramble to release a fix for people that want to use 3.5 in the next couple weeks. This happened when 3.1 (or 3.2) came out, and I expect it to happen again this time around.

So… My dear unfortunate ProPhoto users,

My verdict… Don’t Upgrade Yet.

Wait a few weeks… Keep an ear out for what other early adopters are saying. Then when ProPhoto releases their patches, go for it. It’s always important to stay up to date with WordPress. But when you use a third party solution like ProPhoto, it’s even more important that they work together.


Update Dec 6 – 2:00pm

Just a heads up for those looking in their Admin area. It looks like there were a few bugs left to squash. I’m keeping up with the updates from the Development Team as they come through on Twitter, and will post again when 3.5 goes live.

When Should I Post My Blog To Get More Traffic

05 December

Photo Credit Michael Connell under Creative Commons license.http://www.flickr.com/photos/mdconnell/4843035847/

I know you’ve been working hard on getting your photos ready, culled them down from the 3,000 you took at the wedding, to the 40 you’re going to put up on your blog post and have the world see. You’ve spent a little extra time in Photoshop cleaning up the files to be portfolio worthy, you’ve added Alt Text to each one, wrote a great story about the Bride and Groom with excellent keywords and you’ve got the Yoast SEO plugin filled out with a good Title Tag and description. You’re so proud of yourself… You hit Publish, throw up a link on Facebook, and call it a night ’cause it’s 1AM and you just finished it.

Whoa, What time is it???

The time of day you publish makes a difference?

Yes. It really does. When you posted that blog post you were so proud of, who did you think would see it at 1AM? Sure the Aussies are up, but are they your clients? Are the people that read and follow your blog up? I highly doubt it.

So… When is the best time to post to get the most traffic?

That depends.

How to find the right time to post

You can listen to what all the “experts” say, but why not find out what works best for yourself? It’s not that hard. I’ll show you how, and it will only take a few minutes. It’ll be cool too.


Step 1. Log in to your Google Analytics account. (Don’t have one? Bad dog! You totally should go sign up right now).

Step 2. Select a date range like 3-6 months.

Step 3. Go to the Custom Reports tab (don’t be scared).

Step 4. Create a New Custom Report.

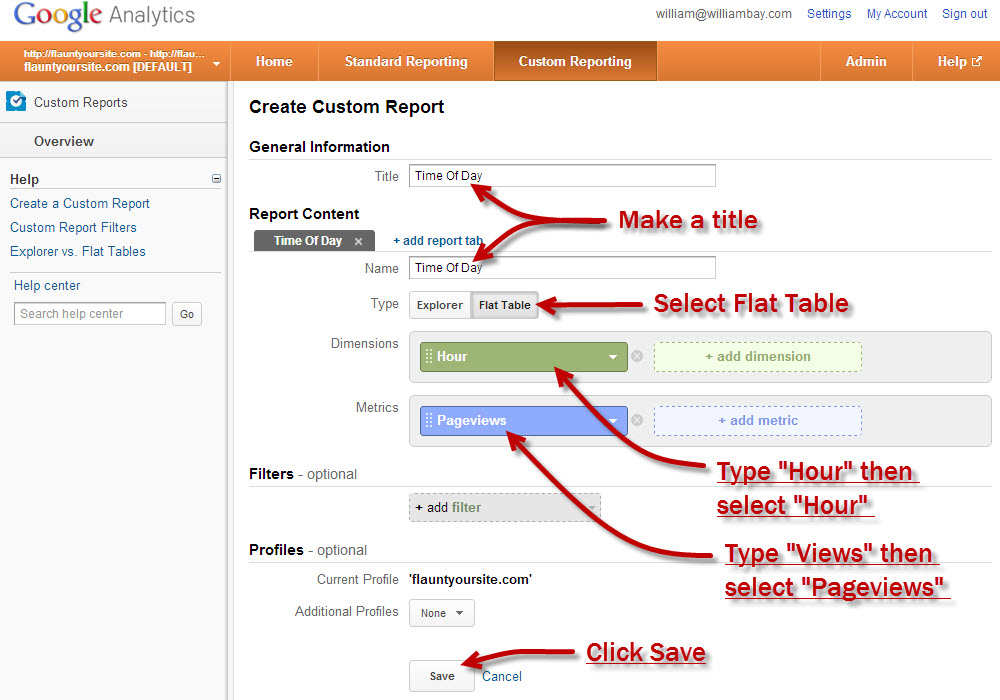
Step 5. Use the settings in the graphic below to fill out the new Custom Report.

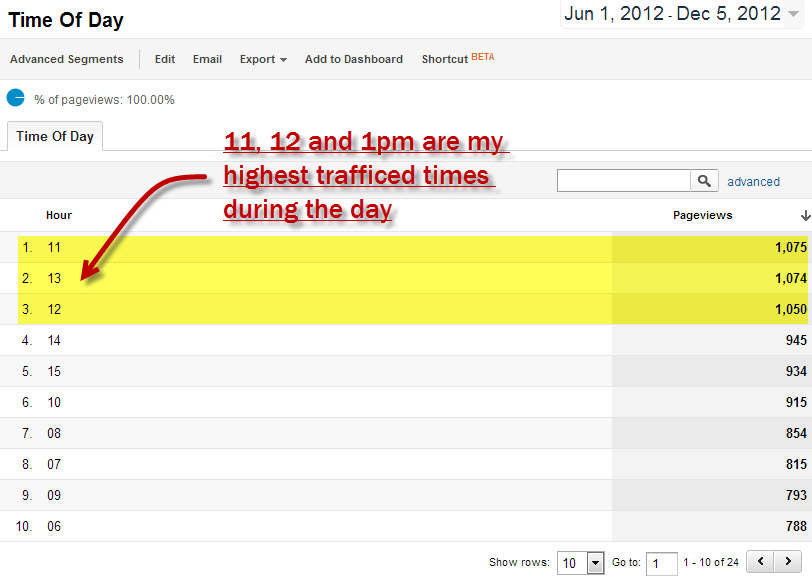
Step 6. Hit save, and you’ll be presented with a breakdown to the most popular times for your website. The breakdown is in 24 hour time, so 1, 2 and 3 PM, are 13, 14, 15 respectively. In my report you can see that Flaunt Your Site’s most popular times are 11am, 1pm, and 12pm meaning that most people are on this site around mid-day, local time. Your results may vary.

Awesome!

OK, now you know what time to post. But did you know you can find out the same thing for the best Day to post???

Yep… You can. Guess what you need to do? That’s right, make another Custom Report. Repeat Steps 1-4, then use Day of Week instead of Hour. See below.

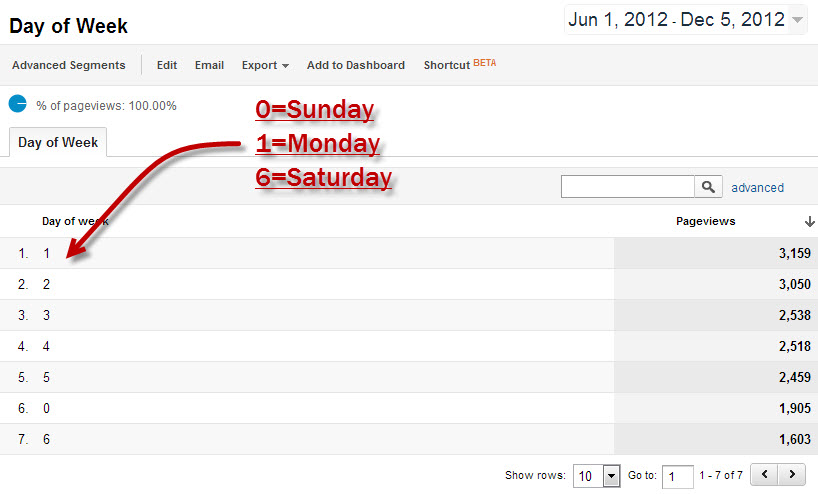
Once you’ve saved it, you’ll see something like this:

As you can see, it just uses numbers to represent the Days of the Week. 0 is Sunday, and 6 is Saturday. And in this graph you can see that over the last 6 months, Monday and Tuesday have been the best days for traffic for Flaunt Your Site.

What next? Announce it! Schedule an announcement!

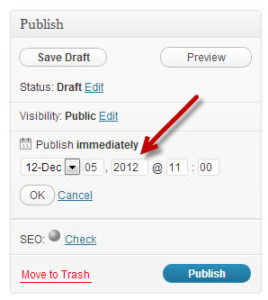
Schedule your posts silly! In WordPress you can actually schedule your posts to go out at a specified time. In my case, if I were posting once a week, I would chose Monday or Tuesday at  11AM to schedule my posts to get the most traffic and readers.

Schedule it in Facebook too! If you have a Facebook Fan/Business Page, you can actually schedule the time you want your status announcing the blog post you worked so hard on.

Schedule it in TweetDeck three! Do you use Tweetdeck or Hootsuite? You can schedule your tweets with either of those cool programs.

Poor Google Plus 🙁 Unfortunately, there is not a way to currently to schedule your G+ status updates. Keep crossing your fingers though. That place keeps getting cooler every couple months. Wait… I just found a Chrome Extension called Do Share. This extension is supposed to schedule your Google Plus statuses for you. I’ll test it out with this post, and provide an update to my experience with it.

What are your peak hours and days?

Now that you’ve gone through the SUPER EASY experience of finding out what your peak times are, why don’t you share with everyone else in the comments when you get the most traffic? Who knows maybe we’ll all find out that it’s the same for all of us, or maybe we’ll find out that every site is slightly unique… But you would never know had you not checked it out for yourself now, hmmm?

Also let me know if you are interested in posts like these. I’m a metric geek. Some might not be. I’d like your opinions.

Thanks!

Stop the SEO Insanity! Use Your Blog Posts Effectively Please

04 December

In yesterday’s blog post I snuck a Pixies reference in there and asked people to see if they could find it. The first person that could would get a link in today’s blog post. Brian Kraft, a Wedding Photographer from Denver came through pretty quick with the answer (It was Paco Pico Piedra from the song Crackity Jones). Maybe I should do that in every post…
Not only is he getting a link, but I asked him if he had a request for a blog topic. Sure enough he did, and that will be today’s topic.

Stop it, seriously!

What Brian was asking about was keyword content on blogs and how having that on many pages sitewide impacted your rankings. And the simple answer is that the more keywords you have on your site doesn’t make your site any stronger than anyone else’s.

See the issue is that SEO is a Per Page phenomenon, not a Site Wide phenomenon. And the more you stuff your blog posts with useless keywords, the more diservice you do to finding unique opportunities. You know the “Your City Wedding Photographer” that you put in every post? Yeah, that’s what I’m talking about.

So what’s the solution, you ask?

Well the first step is to really get the Per Page part of SEO. And to do that, you have to be willing to select one page to be your “Your City Wedding Photographer” page. Usually just one page will rank for a big keyword term like that anyways (and those types of pages often need many links to compete with others), so you want to chose one page and optimize that page very well to get it to be the one that ranks.

OK… So what to do with my blog posts then?

Well, blog posts are a great opportunity to diversify the keywords that you have across your website, increasing the volume of traffic you get from Search Traffic. So instead of using the big head terms, look for unique opportunities that people aren’t taking advantage of… Locations, Venues, Vendors, something unique about the shoot; You did a Walking Dead styled family portrait session? Well talk about it, and make sure you keyword that. There’s got to be someone out there that wants that stuff. And if it’s something you want to do more of, do it full on.

Conclusion, a short and sweet one

Use your blog posts to diversify your links.

Use one page to rank for “Your City Wedding Photographer.”

Boom Baby.

The 7 Best Types of Links for Photographers

03 December

Building links to your website is an unfortunate necessity in today’s online world. If you’re going to get noticed, it’s crucial to have the web of the world crossing through your little corner where you’re selling your services. Not only do you need those crossroads to have the traffic come to you, but search engines are also dependent on links to determine what the most popular sites are. Obviously the more links to a certain page on the internet, the more likely there will be value provided.

With that thought in mind, I wanted to talk about the different kinds of links and which ones are best for professional photographers. I’ve brainstormed a handfull of different link types and I’ve listed them in order from flaming hot to warm bathtub. (I have left out links that have no value at all. So this blog post never gets chilly).

  1. Featured posts

    Getting your work featured on photo blogs are one of the best ways to not only get your work out in front of a larger audience, but also pick up a solid editorial link. Google can determine what part of the site your links are on, and when they’re in the body of the text of the page, as opposed to the footer or the comments section, you’re in much better shape.
    With as many wedding blogs that are out there, like Wedding Chicks, Style Me Pretty and Rock N Roll Bride, you can be assured that your style of photography works on one of them.

  2. Guest posts

    There are quite a few photography resource blogs like Digital Photography School and The Modern Tog that would love for you to submit an article on your area of expertise to help teach their legions of followers. And you will often get a link back to your site for your efforts.
  3. Industry specific directories

    Wedding Wire could be looked at like a dating site where Brides and Wedding Photographers find each other. There are other directories geared towards photo specific industries that do quite a bit to promote the photographers. Wedding Wire does this every year with their Bride’s Choice Awards. Fearless Photographers do their own Fearless Awards each year as well. The links you get from these directories tend to be pretty strong.
  4. Social media

    Facebook is ridiculous, just share your content. You’ll get traffic.
    Google Plus is something that people should really begin to think about sharing your blog posts on. It is a Google property, and we have seen that blog posts tend to get indexed quite a bit faster when submitting your content there.
    If your clientele is fairly techy, Twitter could be a good place to link to your content as well. It’s also a great place to trade jobs with other photographers.
  5. Comments on other blogs

    Comments create a very strong sense of community with other photographers, and at the same time when you leave praise for other people’s photographs, you get a link back to your site. Just a quick reminder… Don’t be spammy, don’t sign your comments as “Santa Cruz Wedding Photographer Paco Paco Picopiedra.” Just use your name and be cool.
    Oh, and don’t forget, if you disable No-Follow on your blog comments, make sure you check out the Followed Photography Sites page and add your link there. Bet you weren’t thinking you’d pick up a link when you came to check out this post huh?
  6. Business directories/Yellow Pages

    There’s a TON of little Yellow Page type business listings. They help create some credibility for your Google Local Listing. If you can get these for free and not a ton of work, grab em.
  7. Profile pages

    Any sites where you’re a member often provide you with a Profile Page. If you’re on Flickr, click on your name and you’ll see you have an area to customize your profile. Add a link there, and you’ll be stylin!

OK, there you have it. Go out and get some links and provide some value to the internets. Leave us some comments if you had some success from our tips.

Those Pesky 404’s and What To Do With Them

02 December

Have you ever been on someone’s site or blog, and clicked on a link only to find a page that says “Page Not Found – 404 Error”? They’re quite annoying when you bump into them aren’t they? Well, what if I told you that you more than likely have them on your site too? Yep, that’s right, the odds are not in your favor when it comes to 404 errors.

The problem with 404 errors is that it reduces the quality of your site. This is an issue for both:

  • The people that visit your site (your potential customers leave when your site when they can’t find what they want)
  • and Google (Google rewards sites that are well maintained, if you don’t maintain your sites, your sites will suffer)

Would you like to know how to find and eliminate them? I thought so…

Finding 404 – Page Not Found Errors

In order to find your 404 – Page Not Found errors you’ll want to log in to your Google Webmaster Tools (GWMT for short). If you don’t have GWMT set up, you should (sign up here with your Gmail or Google Apps account. You can read a little bit more about GWMT in our free ebook Photographers Web Marketing E-Book.

Once you’re in GWMT look at the left side and click Health, then Crawl Errors. You’ll see the trend of errors over a few months. It could be growing or shrinking, the goal of course is to shrink them. Here’s a view:

As you can see you can see the current number of Errors, and down below you can see the actual addresses that have the errors so you can find out which ones are the problem. Once you fix them (keep your britches on, we’re getting there in the next session), you can check each one, and click the red “Mark As Fixed” button, and Google will confirm you fixed it, and remove the error.

I would check this every few months to ensure that your website quality is always maintained. You can easily schedule this as a recurring calendar item in Outlook or G-Calendar.

How to Wipe Those Pesky Buggers Out

Now that you’ve got a list of your 404 errors, it’s time to fix them. There are a few reasons why a page might be missing:

  • You may have changed the url of a page
  • You may have deleted a page that you didn’t need anymore
  • You may have deleted a page by accident
  • Misspellings (either from you or other people).
  • You forgot the “http://” portion of a URL.

Determining what the error is takes a little detective work. But it should be pretty easy to figure out if you know your content.

The Easy Fixes

Easy fixes will be the ones that you obviously misspelled or forgot to put the “http://” in the original linking Page or Post. All you have to do is go into the place that you referenced and fix the URL.

The Not So Easy Fixes

Not so easy fixes are the ones that other people misspelled their links, or you removed content, moved content, etc. Or things that you just can’t figure out why you got a 404 in the first place. What I like to do is use a WordPress plugin called Redirection. Redirection is a great tool that will actually help you when you move content, change addresses of Pages and Posts, or even change your Permalink Structure.

In this case we’re going to manually insert the error URLs and provide new URLs to take the place of the old ones. This creates a 301 redirect which is a server code that tells Google and other computers and servers that the page you are trying to view permanently moved to a new location, and redirects the viewer automatically (all behind the scenes).

When you have Redirection installed, go to the menu on the left side of your WordPress Admin area, and go to Tools, Redirection is under Tools. Click on that, and you’ll see this:

If you’ve figured out WordPress, using Redirection should be pretty easy to use. 🙂 Just enter your problem URLs, and your new URLs, and you’re good to go.

Here are a few tips on selecting the right URLs to send to:

  • If you moved the Page somewhere, try to find that URL
  • If you deleted a Page, try to find something similar to the Page you deleted (example: If the problem URL pointed to a Wedding Photography Promotion you deleted, you can have it point to your Wedding Photography Pricing page)
  • If you don’t have something similar, you can redirect it to your home page (do this sparingly)


Bringing it Full Circle

Once you’ve gone through and fixed your problem URLs (whether it was an easy fix to a typo, or having to redirect an old URL to a new one), you’ll want to go back into GWMTs and check off each URL that you fixed, and hit that red button. That will get Google to re-crawl those links and check your work. If your URLs had great information on those pages, you’ll be rewarded with having those pages indexed again and generating traffic yet again.

Who knows you may have a huge bump in traffic and potential new customers that were trying to get your content for some time.

OK… Go forth and fix your websites! And as always, if you need help, we’re here for you as well.

Get Your Own Custom Short URLs for Twitter

01 December

If you use Twitter to share your blog posts and photos, you’ll no doubt have noticed that you need to use short urls in order to fit your content in the 140 characters and still get your link in. There are shortening services like Bitly, and Goo.gl that will automatically make short urls for you that you can use for your tweets. But I’d like to share a couple ways to customize your own short urls for Twitter.

Customize your Bitly Links

Did you know that you can actually change the URLs when you use Bitly? Yeah! It’s pretty frickin cool. Check it out:

  1. First create an account or login to Bitly.
  2. Paste your URL into the box that says “Paste URL here”
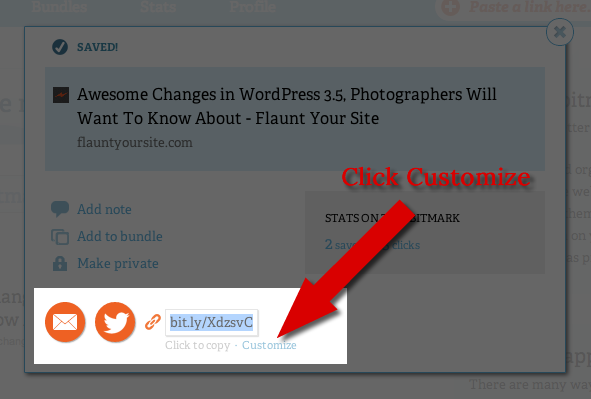
  3. A screen will pop up with your new shortened URL. If you hover your mouse over the new URL, you’ll see a link that pops up that says “Customize” Click that…
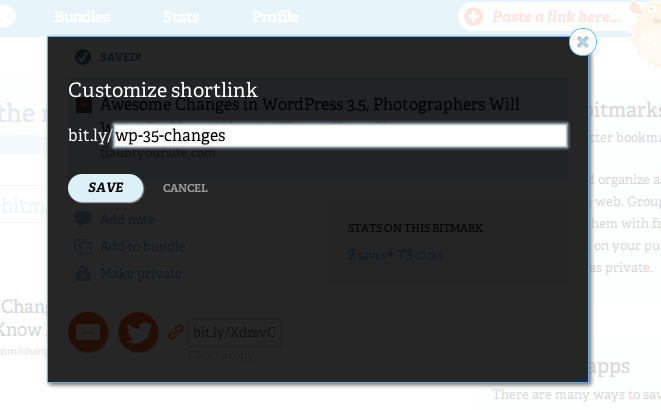
  4. Now you’ll get the customize screen. Now by default Bitly uses a 6 character url after the “http://bit.ly” portion, so you’ll want to keep your custom URLs as short as possible. In my example, I added just enough characters to make it somewhat recognizable what the page is about with http://bit.ly/wp-35-changes. It more than doubles the standard length, but it’s still way shorter than the original post URL.
  5. And there you have it! Your very own custom shortened URL using Bitly. You can use that as many times as you like since it will always be saved in your Bitly account.

Creating Your Own Short Domain

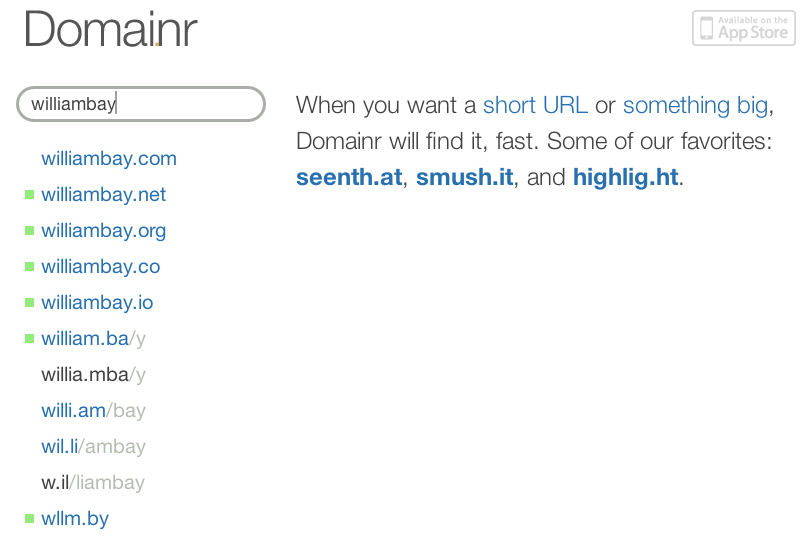
So you now know how to create short URLs with Bitly, but what if you wanted a short URL of your own to use? Well, you can use Domai.nr to create special short domains and use those instead of using http://bit.ly. All you have to do is go to  Domainr and fill in your business name, personal name, etc. You’ll get a list of unique names/domains combinations with alternate TLDs. The green squares indicate whether or not the domain is available.

In my case I used my own name William Bay, and I get to choose which of the domains I would like to purchase and use for a shortened URL.

The other great thing is that you can use your new shortened domain name in Bitly, so Bitly will shorten your URLs when you want to paste them in Twitter. If you follow the instructions here you can see how to setup the domain to work with Bitly automatically.

Conclusion

While these techniques won’t increase your SEO, it will definitely bring a cool factor to your links in Twitter (plus a little more branded experience). And that “cool factor” could be enough to pick up a few extra click throughs each time you post a tweet.

Let us know if you do this. I’d love to see some of the short domains that you all create from your regular domains. We love that here.

Why Insert All – Use Gallery Shortcode

30 November

One of the Holy Grails for photographers using WordPress is inserting all the photos from a particular photo session or wedding. There have been a few plugins that have tried to fit the bill for what our picky tribe have wanted.

But much like the Secret Menu at In & Out Burger, WordPress has a little Secret Menu itself that takes care of this problem. It lets you insert all your uploaded photos, and lets you re-order them if you ever need to very easily. It’s calle the Gallery Shortcode, and is very easy to use, let me walk you through it.

Step 0

Before we get started, you’ll want to set your Large photo to at least the same width of your blog (Twice that if you want to be ready for Retina displays). So if your blog displays 800 pixel wide photos, you’ll want to go into your Media Settings and change the Large photo to 800 pixel wide.

  Step 1

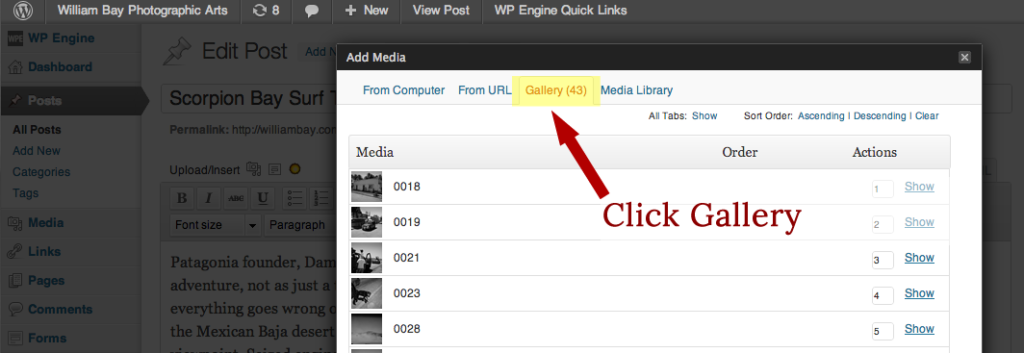
Start a new blog post and write the content that you want, then click on the Media Uploader to upload your images. After they’ve uploaded, click “Save All Changes” at the bottom of the upload screen. When you do that, you’ll see a new menu item pop up in the top called Gallery with the number of photos you just uploaded.

Step 2

You can change the order of these photos by selecting them and dragging up or down. When everything is set right for you, you can scroll to the bottom, select 1 Column, and then click Insert Gallery.

Step 3

In the Visual Editor, you’ll now see a blue rectangle that represents the Gallery that you just inserted. Since the Gallery defaults to Thumbnail size, if you were to preview your blog post now, you would see 1 column of small photos. What we want to do in the next step is change those to Large.

Step 4

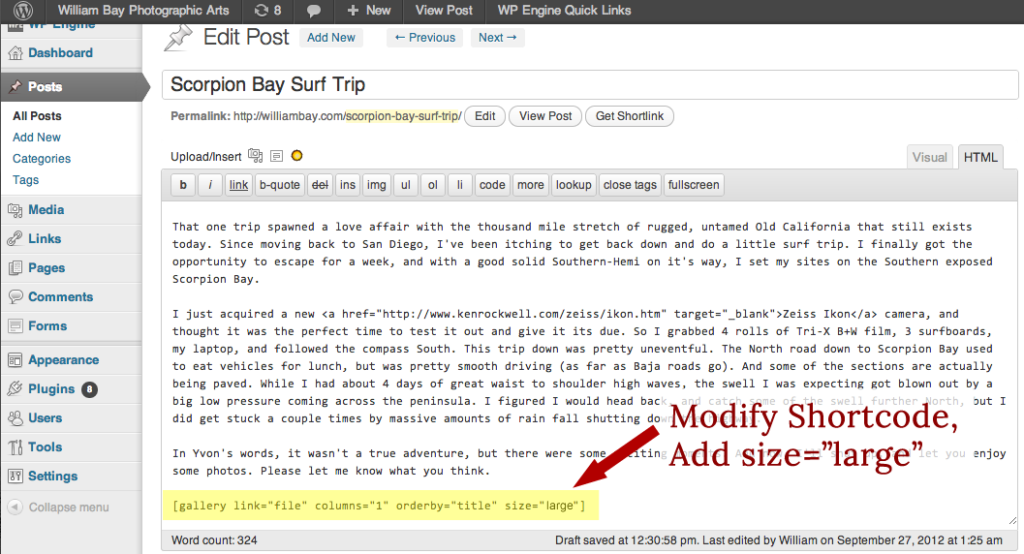
To change the photos to Large, you’ll have to switch into the HTML editor, and find the Gallery Shortcode. The Shortcode will be within [] brackets and will look something like

You’ll want to add – size="large" to the code so it looks like

And you’re done!

Step 5

Publish and rejoice! You can see this particular post here.

Conclusion

The great thing about using the Gallery Shortcode is that you can go back into the post and reorder the images if you ever need to, by just going back into the Gallery menu item at the top, updating the order, then updating the post.

If you use the Gallery Shortcode, the style may be a little different than just inserting the images directly, depending on your theme. If you want to adjust the spacing between photos, or remove any borders that show up, you’ll have to go into the CSS and make the changes there. If you’re not comfortable, give us a ring, we can help you out.

If you use this technique, let us know. We love hearing it when our followers get some use from our tips.

Update

@jonyoder from Jon Yoder a wedding photographer from Little Rock pointed out that when using the Gallery Shortcode method you can’t insert text in between images. This is true, but you can use Captions for each photo. These will display differently based on which theme you’re using. But this is an effective way to describe your photos or talk about what was happening. Thanks for pointing that out Jon!

Awesome Changes in WordPress 3.5, Photographers Will Want To Know About

19 November

WordPress 3.5 is just around the corner, and there are some hot new changes that will be beneficial for photographers. They’ve talked about a new Media Uploader as one of the new features, so I’ve been stalking the Betas as they’ve been released to see what improvements they’ve been making. Last week the third Beta came out I thought I’d give a sneak preview of my findings and thoughts on the new direction they’ve taken.

Current Problems

Currently WordPress isn’t designed to handle lots of images. Your typical blogger uses 3-5 images in a blog post at most for a 400-800 word blog post. Professional Photographers on the other hand often use 20 or more; I know some crazy photographers that have put 100 or more photos in a blog post even! Inserting all those photos is a P.I.A. using the current uploader. Sure there are tricks like using the Gallery Shortcode, but using the Shortcode is like ordering off the Secret Menu at In & Out Burger; there’s some great stuff on it (can you say Double Double Animal Style?), but maybe 20% of the people know about it. And in the case of the Gallery Shortcode options, maybe even less.

I think the guys at WordPress finally figured that they needed to beef up the ability to handle more images than they were used to. It really shows in this latest Beta. Let’s take a look…

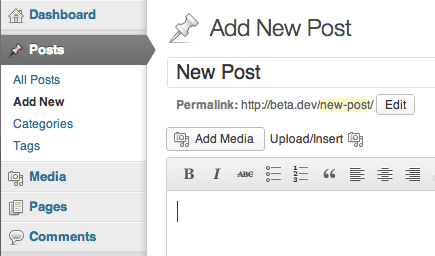
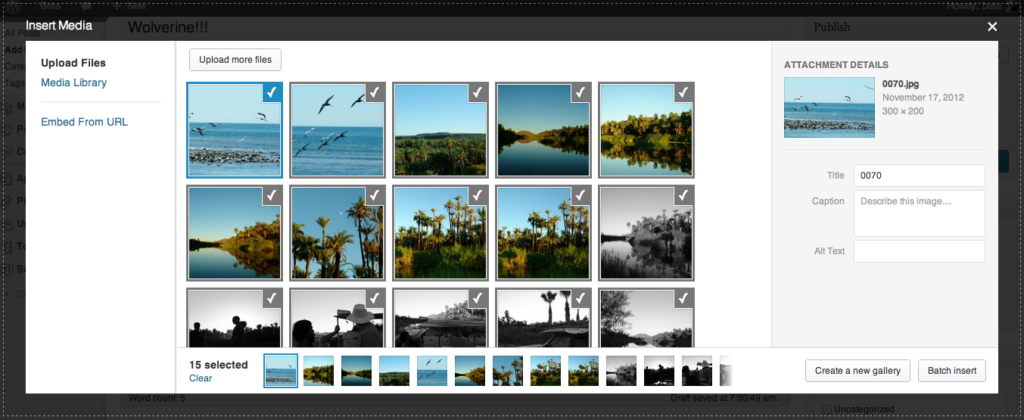
In the Beta they have both the new way and the old way to insert Photos and other Media. By selecting the Add Media button, you get the new version.

I’m not sure what the plans are for the final release, but I would imagine that they would eliminate the old uploader. There will undoubtedly be upset people at first, but as they get used to the new system, I’m sure they will come to enjoy using it.

The New Dialog Box

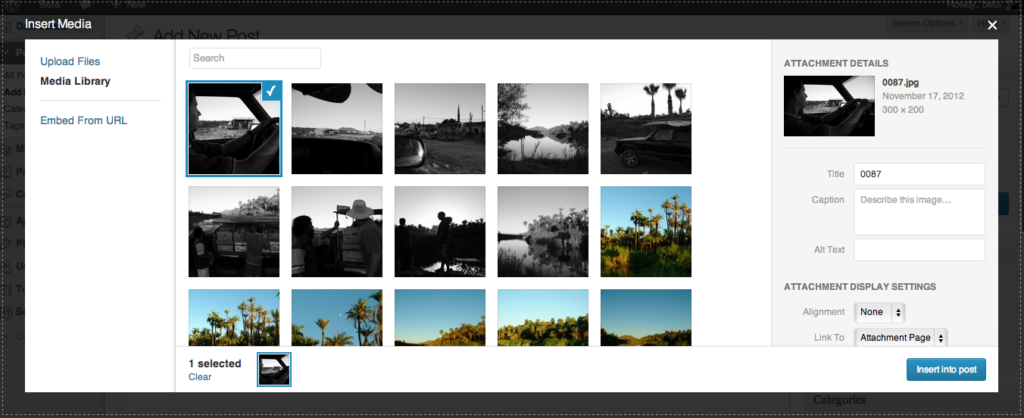
As you can see, the new Insert Media is redesigned quite a bit. They’ve moved the “Upload Files,” Media Library,” and “Embed From URL” options to a new left column, and increased the size of the dialog box to be full screen. This helps display more thumbnails, larger when adding photos or looking through the Media Library.

The Media Library Option

Selecting photos from the Media Library is much easier than before. Before the thumbnails were small, you couldn’t see the meta information without clicking the image and waiting for its properties to drop down, and you only had the ability to see 10 photos at a time.

In the new system the thumbnails are much larger, and… they’ve added INFINITE SCROLL!!! WooHoo!
The column on the right gives you a preview of the photo selected, and the meta is displayed right there, making it easier to add or change Titles, Captions and Alt Text as well as a few other things.

Embed From URL

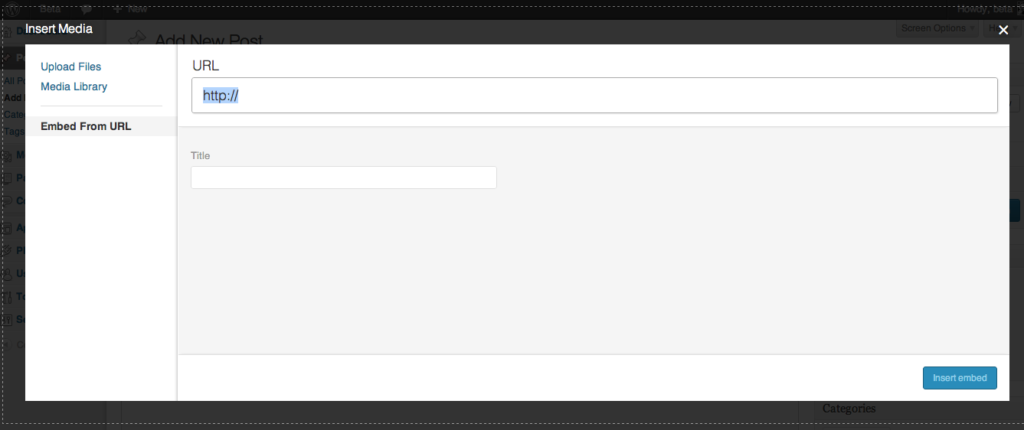
While they’ve made many improvements to the Media Library, the Embed From URL option seems like it was just an after thought. It may not be a very frequently used option these days, but it still seems like they didn’t spend much time on it. It pretty much floats in a huge dialog box. They could’ve made the dialog box shrink to an appropriate size when selected to give a bit more polish and thought.

Inserting Photos

The process of inserting photos is much easier now. The dialog is very similar to the Media Library with its larger thumbnails and ability to scroll through all the photos you uploaded. Your information is displayed in the column on the right, and you now have the ability to Insert All Photos. This is a feature that’s been long overdue and has been tried by plugins (even we had a solution for awhile that did this). You can also create Galleries (if you’re not familiar with them check out how WordPress Galleries work).

Although WordPress has stated that it’s complete, there are a couple points that I think need to be modified before the public version:

  • There is no Select All button. You can Clear All selections, but you can’t Select All yet. So if you insert 40 images and wanted to use them in a Gallery, and you accidentally Clear All, you have to select all 40 images one by one again.
  • The smaller thumbnails below the thumbnail window is a bit redundant. It shows 12 images, whereas if it were eliminated, you’d have full view of 15 larger thumbnails.
  • The left column with the Upload Files, Media Library and Embed From URL is pretty much wasted space at this point. It may be better to stick them across the top like before to pick up a little more real estate for the thumbnails.

Final Thoughts:

While this isn’t a professional solution (don’t worry, Flaunt Your Site is working on that), the changes that WordPress has made will be highly welcomed by the photographers that deal with high quantities of photos on a daily basis. While it still has some items that need to be addressed, I think that the new WordPress Media Uploader is a decent first attempt at a new method of getting your photos in your posts and pages.

OK, so when do we get it?

WordPress has the release scheduled for December 5th. So we’re just a couple short weeks away from being able to use it! Keep an eye out for that Update WordPress button, and happy photo uploading.